Introduction
How to Install Lightning Arrester for Home? In today’s rapidly evolving world, our homes are brimming with electronic gadgets and appliances, making it more crucial than ever to safeguard them from the capricious forces of nature. One such formidable force is lightning, an awe-inspiring but potentially destructive natural occurrence. To shield your home from the devastating effects of lightning strikes, lightning arrester for home emerge as essential guardians of your electrical infrastructure. In this comprehensive guide, we will delve into the intricacies of installing a lightning arrester, ensuring your home remains safe in the face of thunderstorms and electrical storms.
Understanding Lightning Arrester Basics
Before we embark on the installation journey, it’s vital to grasp the fundamental principles of a lightning arrester. Also known as a lightning diverter or a surge arrester, this device is designed to intercept and divert the immense energy of a lightning strike, preventing it from entering your home’s electrical system. In simpler terms, a lightning arrester acts as a sacrificial lamb, absorbing the destructive power of lightning to safeguard your valuable electrical equipment and the structural integrity of your home.
Types of Lightning Arrester for Home
Here are some common types of lightning arresters for homes:
- Rod-Type Lightning Arrester:
- Description: Rod-type lightning arresters are one of the most recognizable types of lightning protection systems. They consist of a tall, pointed metal rod usually made of copper or aluminum.
- Installation: The lightning rod is mounted on the highest point of your home, such as the roof or chimney. It attracts lightning strikes and safely directs the electrical energy down into the ground through a conductor cable.
- Advantages: Effective at diverting lightning strikes away from the structure, simple design, and relatively easy installation.
- Cable-Type Lightning Arrester:
- Description: Cable-type lightning arresters involve a network of conductive cables that are strategically placed along the roofline and exterior walls of your home.
- Installation: These cables create a grid-like system that disperses lightning strikes evenly across the structure, reducing the risk of a direct hit. The cables are connected to grounding rods to dissipate the electrical energy into the ground.
- Advantages: Comprehensive protection by distributing lightning strikes, suitable for larger structures, and can protect multiple buildings if interconnected.
- Early Streamer Emission (ESE) Lightning Arrester:
- Description: ESE lightning arresters are advanced systems designed to detect the approach of lightning and emit a streamer before a lightning strike occurs.
- Installation: They are typically mounted at a higher point on the structure and require a power source for operation. When the system detects an approaching lightning strike, it emits a streamer that can initiate the lightning strike at a safer distance from the structure.
- Advantages: Offers a proactive approach to lightning protection, potentially intercepting lightning strikes before they reach the structure, suitable for larger properties.
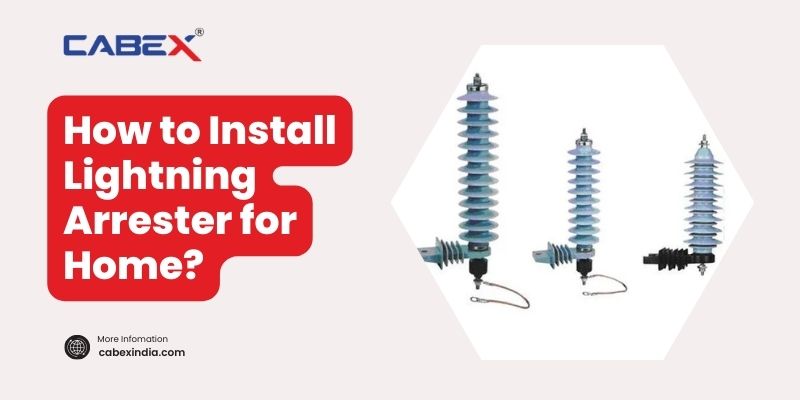
- Surge Protective Devices (SPDs):
- Description: Surge protective devices, commonly known as surge protectors or surge suppressors, are not traditional lightning rods but are vital components in lightning protection.
- Installation: SPDs are installed at your home’s electrical panels and near sensitive electronic equipment. They work by diverting excess voltage caused by lightning strikes or power surges away from your appliances and electrical system.
- Advantages: Protects electronic devices and appliances from damage caused by power surges, an essential component of a comprehensive lightning protection strategy.
- Multi-Point Air Terminal System:
- Description: This system combines both rod-type and cable-type elements. It includes multiple lightning rods positioned at various points on the structure, along with interconnected cables.
- Installation: The combination of rods and cables provides a well-rounded defense against lightning strikes. Lightning energy is collected by the rods and dispersed through the cables to grounding rods.
- Advantages: Offers enhanced protection by combining the strengths of both rod and cable systems, suitable for homes in high-risk lightning areas.
- Non-Conventional Systems:
- Description: Non-conventional lightning protection systems include innovative technologies like charge transfer systems, plasma lightning rods, and laser-based systems.
- Installation: These systems are often more complex and may require specialized installation by trained professionals. They aim to provide advanced lightning protection solutions.
- Advantages: These systems are continually evolving and may offer cutting-edge protection, but they may also come at a higher cost.
Planning the Installation for Lightning Arrester for Home
A successful lightning arrester installation begins with careful planning. Here’s a step-by-step guide to ensure everything is in order:
- Site Assessment: Begin by conducting a thorough assessment of your property. Identify the highest points, such as chimneys, antennas, or rooftop equipment, where lightning strikes are more likely to occur. This assessment will help determine the ideal locations for your lightning arresters.
- Selecting the Right Arrester: Consult with a professional or do some research to choose the most suitable lightning arrester for your home. Consider factors such as the local climate, the type of structure, and your budget.
- Consulting an Electrician: It is highly recommended to engage a licensed electrician for this installation. Lightning arresters involve intricate electrical connections, and the expertise of a professional is indispensable.
- Permit and Regulations: Check local building codes and regulations related to lightning protection systems. Some areas may require permits for such installations.
The Installation Process for Lightning Arrester for Home
Now, let’s delve into the actual installation process, broken down into detailed steps to ensure a safe and effective setup.
Step 1: Assembling the Materials
Gather the necessary materials and tools for the installation:
- Lightning Arrester Kit: This should include the lightning rod or cable, ground rods, connectors, and all required hardware.
- Drill and Anchors: To secure the lightning arrester to your structure.
- Cable Clips: For securing the lightning arrester cables along the roofline or walls.
- Wire Cutters and Strippers: To prepare the cables for connection.
- Grounding Rod Driver: For sinking the grounding rods into the earth.
Step 2: Location Selection
Based on your site assessment, choose the ideal locations for your lightning arresters. Keep in mind the following considerations:
- Place lightning rods or cables at the highest points of your structure.
- Ensure that the lightning arrester is positioned away from flammable materials, such as wood or dry leaves.
- Maintain a safe distance from other metallic objects on your roof to prevent potential arcing.
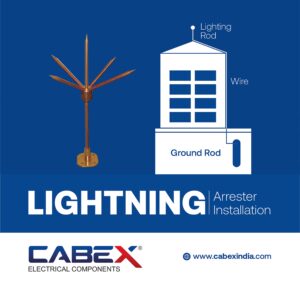
Step 3: Lightning Rod Installation
If you’ve opted for rod-type lightning arresters, follow these steps:
- Mounting the Rod: Securely attach the lightning rod to the highest point on your structure, using appropriate anchors and brackets.
- Cable Connection: Connect a copper or aluminum cable to the lightning rod. This cable will serve as the conductor to channel lightning energy safely to the ground.
- Routing the Cable: Run the cable down the side of your structure, securing it with cable clips to prevent it from hanging loose.
- Grounding: Drive a grounding rod into the earth near the lightning rod. Connect the other end of the cable to this grounding rod, ensuring a low-resistance path for lightning discharge.
Step 4: Cable-Type Lightning Arrester Installation
For cable-type lightning arresters, the process is slightly different:
- Cable Network Installation: Strategically place the network of lightning arresters along your roofline and exterior walls. Ensure even coverage for maximum protection.
- Cable Routing: Securely attach the cables to your structure, ensuring they follow the roofline and walls closely.
- Grounding: Drive grounding rods into the ground, and connect the cables from the lightning arresters to these rods. Maintain proper spacing between the grounding rods to ensure effective dissipation of lightning energy.
Step 5: Final Connections
Regardless of the type of lightning arrester you choose, you’ll need to make crucial connections:
- Main Conductor: Connect the main conductor cable from the lightning arrester to your home’s electrical system. This cable acts as the primary path for lightning to divert safely to the ground.
- Surge Protector: Install surge protectors at your electrical panels and sensitive equipment. These devices add an extra layer of defense against power surges caused by lightning strikes.
Step 6: Testing and Maintenance
After the installation, it’s vital to test the lightning arrester system to ensure it functions correctly. Consult with your electrician to perform the necessary tests.
- Regularly inspect the lightning arrester for any signs of damage or corrosion.
- Replace any damaged components promptly to maintain the system’s effectiveness.
- If your area experiences frequent lightning activity, consider scheduling annual inspections by a professional.
Lightning Protection Standards
Lightning protection standards are crucial guidelines and regulations established to ensure the safety of structures, occupants, and electronic equipment from the destructive forces of lightning strikes. These standards provide detailed instructions for the design, installation, inspection, and maintenance of lightning protection systems. Compliance with these standards is essential to mitigate the risks associated with lightning strikes effectively. Here are some prominent lightning protection standards from around the world:
1. NFPA 780 (National Fire Protection Association 780)
- Country: United States
- Overview: NFPA 780 is the primary lightning protection standard in the United States. It covers the design, installation, and maintenance of lightning protection systems for buildings and structures.
2. IEC 62305 (International Electrotechnical Commission 62305)
- Region: International
- Overview: IEC 62305 is a globally recognized standard that provides a comprehensive framework for lightning protection. It consists of several parts, each addressing different aspects of lightning protection, including risk assessment, design, and installation.
3. EN 62305 (European Norm 62305)
- Region: Europe
- Overview: EN 62305 is the European counterpart of IEC 62305. It sets the requirements for lightning protection systems within Europe, including design, installation, and maintenance.
4. BS 6651 (British Standard 6651)
- Country: United Kingdom (superseded by BS EN 62305)
- Overview: BS 6651 was the British Standard for lightning protection. It has been superseded by BS EN 62305, which aligns with the European standard.
5. UL 96 (Underwriters Laboratories 96)
- Country: United States
- Overview: UL 96 is another standard in the United States, published by Underwriters Laboratories. It covers the installation requirements for lightning protection components.
6. SANS 10313 (South African National Standard 10313)
- Country: South Africa
- Overview: SANS 10313 is the lightning protection standard used in South Africa. It provides guidelines for the design and installation of lightning protection systems.
7. AS/NZS 1768 (Australian/New Zealand Standard 1768)
- Region: Australia and New Zealand
- Overview: AS/NZS 1768 is the standard used in Australia and New Zealand for lightning protection. It includes provisions for the design, installation, and maintenance of lightning protection systems.
8. IS 2309 (Indian Standard 2309)
- Country: India
- Overview: IS 2309 is the Indian Standard for lightning protection systems. It outlines the requirements for protecting structures and equipment against lightning strikes.
9. CSA B72 (Canadian Standards Association B72)
- Country: Canada
- Overview: CSA B72 is the Canadian standard for lightning protection. It covers the design and installation of lightning protection systems in Canadian buildings and structures.
10. LPS 1014 (Loss Prevention Standard 1014)
- Region: United Kingdom
- Overview: LPS 1014 is a specific standard developed by the Loss Prevention Certification Board (LPCB) in the UK. It focuses on the certification and testing of lightning protection products and systems.
Conclusion
Installing a lightning arrester for home is a prudent investment in safeguarding your property, loved ones, and valuable electronic equipment from the unpredictable wrath of lightning. By following the steps outlined in this guide and consulting with a qualified electrician, you can fortify your home against the forces of nature. Remember that while lightning arresters provide significant protection, no system can guarantee absolute immunity from lightning strikes. However, with the right precautions in place, you can significantly reduce the risks and minimize potential damage. So, take action today and ensure your home is well-prepared to face the thunderous skies.
Need Expert Cable Gland Solutions?
Ensure safety and durability in hazardous environments with our range of Explosion-Proof Cable Glands and Industrial Cable Glands.
Explore Explosion-Proof Cable Glands:
https://cabexindia.com/explosion-proof-cable-gland/
See Industrial Cable Glands:
https://cabexindia.com/industrial-cable-gland/
You May Also Like: Top Questions Cable Accessories, Buy Explosion-Proof Cable Glands Online